

Installing an electric trolling motor on your kayak will open a whole new world of fishing opportunities. With a trolling motor you can travel faster, farther and more easily on the water. The biggest benefit of using a trolling motor is that it propels your kayak through the water, leaving your hands free to focus on casting, fishing, and working your lure.
Selecting a trolling motor for a fishing kayak is a little different than for a larger fishing vessel such as a bass boat or jon boat. You still need to consider the basics, including thrust, shaft length, and mount type, but their are unique considerations such mounting system, motor placement, and of course the weight of the motor. A trolling motor that weights 50 pounds is doable for a 2000 lb bass boat, but could capsize a kayak.
Below I’m going to hit off on each of the general and specific factors to consider when purchasing and installing a trolling motor on a kayak—specifically focusing on fishing kayaks. I’ll also include a few useful charts that will help make the selection process a little easier and keep you from over thinking it.
- How Much Thrust Does Your Kayak Need?
- Calculating Approximate Running Time
- Calculating Approximate Speed in Miles Per Hour
- Calculating Approximate Horsepower
- Battery Types, Size and Selection
- Pros and Cons of Lithium Batteries
- Wiring Batteries in Parallel to Increase Running Time
- Wiring Batteries in a Series to Increase Power
- Where to Store a Battery on a Kayak?
- Determining Trolling Motor Shaft Length
- What are my mounting options?
- Propeller Sizes, Compatibility, and Benefits
How Much Thrust Does Your Kayak Need?
Regardless of boat size or type, it all starts with thrust. If you don’t get the thrust part right, you won’t have the propulsion you need and may just end up a stick in the mud—no pun intended. So let’s quickly explore the concept of thrust and then apply it to propulation considerations and calculations for a fishing kayak.
Obviously the larger and heavier a boat the more thrust required to propel it through the water. As a rule of thumb you want to have about 2 pounds of thrust for every 100lbs of weight. So for a fishing kayak with a total weight of 600 pounds—including occupants and gear—a minimum thrust of 12 lbs is required (600/100*2). Twelve pounds doesn’t sound like much thrust and it really isn’t. It’s a minimum and not what I’d use for a 600 pound kayak setup.
So the first step is to determine how much your kayak weighs. You don’t really need a precise measurement here. A close estimate will suffice. The following chart lists the fully loaded weight (kayak weight + weight capacity) of the most common kayak types.
| Sit Inside | Sit On Top | Inflatable | Fishing Tandem | Ocean Surf | |
|---|---|---|---|---|---|
| Length | 9'-11' | 9'-11' | 10'-13' | 13'-15' | 10'-18' |
| Kayak weight (lbs) | 30-50 | 40-60 | 20-50 | 50-100 | 40-110 |
| Weight Capacity (lbs) | 250-350 | 350-400 | 500-650 | 600-770 | 250-690 |
| Fully loaded (lbs) | 280-400 | 390-460 | 520-700 | 650-870 | 290-800 |
Note: Fully loaded weight includes weight of the kayak, passenger and gear. Inflatable kayaks include both single and 2-person. Tandem kayaks includes both inflatable and non-inflatable kayaks.
Once you have a good idea how much your kayak weighs, you can use the following chart to help you determine minimum and maximum trolling motor thrust requirements. Again, 2 pounds of thrust for every 100 lbs of weight is a rule of thumb. I recommend going a little higher, but you don’t want to overdue it (for reasons we’ll discuss below.)
| Kayak Weight (fully loaded) | Min Thrust (lbs) | Max Thrust (lbs) | Voltage |
|---|---|---|---|
| 400 lbs | 8 | 30 | 12v |
| 500 lbs | 10 | 40 | 12v |
| 600 lbs | 12 | 40 | 12v |
| 700 lbs | 14 | 55 | 12v |
| 800 lbs | 16 | 55 | 12v |
| 900 lbs | 18 | 55 | 12v |
Note: “Max thrust” figures included in the above table are subjective.
When you’re purchasing a trolling motor for a larger boat, the trolling motor acts as the secondary source of propulsion. It serves as a backup motor in case of main motor failure, and more often than not is used solely to keep a boat on course or for trolling at slower speeds of 2-3 mph. For a kayak, a trolling motor will also serve to maintain course and troll, however, it’s often used as the primary source of propulsion. As such, it makes sense to use a trolling motor that can provide a bit more propulsion than the bare minimum to get you where you’re going and back again a bit quicker.
Thrust is similar to “torque” in an automobile. It is the twisting or turning force that causes the propeller to rotate. But it doesn’t directly correlate to more horsepower or higher speed. A common misconception is that the more thrust equals higher speed. This is somewhat true. You do need to have sufficient thrust to go faster. But speed is also determined by gear ratio and propeller size. A trolling motor with high torque, low gear ratio, and larger diameter propeller will produce more speed—but again, you need all three.
Weather and water conditions also factor in to thrust requirements. If you’re going to be tackling waves, current, or wind when you go out, you’ll want to add a bit more thrust to the equation. If you’re planning on traveling a distance on the water, you’ll want enough propulsion to be able to book it back to the shore quickly if the weather turns south.
I’ve heard some anglers say you can never have too much thrust, but my experience suggests this isn’t necessarily the case. All things being equal more thrust is better than less thrust, but sometimes the cost of having more thrust outways the benefit. More powerful motors may be larger, heavier and require additional space to store batteries—all factors that can be detrimental to performance and safety on the water.
Calculating Approximate Running Time
This is an especially important calculation for kayakers using a trolling motor as their primary source of propulsion. The last thing you want is to travel 2 hours offshore if your total running time is only 3 hours. This leaves you 1 hour short of the 4 hours you need to get out and back safely.
To calculate running time take your battery amp hour (Ah) ranking and multiple it by 85%. Then divide that number by motor amp draw. This will equal your approximate running time.
100 x .85 / 30 amps = 2.83 hours
100 x .85 / 10 amps = 8.5 hours
Note: This is an estimated approximate running time based on full speed.
Calculating Approximate Speed in Miles Per Hour
Calculating speed is almost as important as calculating running time. First, you want to know how long you’re going to be able to fish. Second, you want to know how quickly you’ll be able to get out and back again.
To calculate speed in MPH take your prop pitch (4″), times RPMs (950), times slip factor (85%), divided by 12 (inches in 1 foot). Take this number and multiply it by 60 (minutes in an hour), divided by 5280 (feet in a mile). The output will equal speed in MPH.
(4 x 950 x .85 / 12) x (60 / 5280) = 3.05 MPH
A lightweight kayak with a decently powerful electric trolling motor can achieve some respectable speed (4-6 mph) on open water.
Calculating Approximate Horsepower
Thrust is a much more useful measure than horsepower for assessing and comparing performance of electric trolling motors. But sometimes converting thrust into horsepower helps bridge the gap between gas and eletric motors and makes purchasing an electric motor a bit easier for those anglers more familiar with gas motors.
To convert thrust into horsepower multiply motor AMP draw by voltage to calculate wattage. Now divide wattage by 746 (watts in 1 hp) to calculate horsepower.
(45 x 12) / 746 = 1.45 hp
It’s that simple.
Battery Types, Size and Selection
Trolling motors come in three voltage ratings: 12v, 24v and 36v. Motors that provide higher thrust have higher voltage requirements. Generally, a 12v battery provides enough voltage to power up to a 55 pound thrust trolling motor—more than sufficient for most kayaks. The following chart provides voltage requirements, as well as the number of batteries required to provide voltage at varying levels of thrust.
| Min Thrust Level (lb of thrust) | # Batteries (voltage) |
|---|---|
| 30 | 1 (12v) |
| 40-45 | 1 (12v) |
| 50-55 | 1 (12v) |
| 70 | 2 (12v+12v=24v) |
| 80 | 2 (12v+12v=24v) |
Run time is also an important consideration when determining both thrust and battery requirements. A 70 pound thrust trolling motor with two 12v batteries (24v) is going to run longer than a 50 pound thrust motor that uses a single 12v battery. If your trolling motor is going to be your primary means of propulsion then you really need to determine how long you’re going to be able to rely on your motor for propulsion.
There are a few different types of batteries that can be used to power electric trolling motors: Deep Cycle (Lead-acid), Starter and Lithium Ion. You want to use a deep cycle or lithium ion.
A deep cycle battery, also known as a marine battery, is a lead-acid battery designed to be discharged and recharged regularly. They are designed to release stored energy slowing over long periods of time until they are completely drained and then fully recharged without causing damage to the battery.
Starter batteries are designed to to crank a combustion engine. These batteries discharge a large amount of current for short bursts. Unlike a deep cycle battery, each time a starter battery charge drops too low the battery is degraded. A starter battery can power a trolling motor, but it will ruin the battery in pretty short order.
If you go with a deep cycle battery, you have one of two options: wet-cell or sealed lead-acid. A wet-cell lead acid is the most cost effective option, but it requires more maintenance, is suscpetible to leakage, and typically doesn’t stand up as well to vibration as sealed lead-acid batteries. If a wet-cell lead-acid batter is turned on its side or falls over, it will leak. Constant vibration has also been known to break the internal battery plates. Like a starter battery, wet-cell lead acid batteries can power a trolling motor, but they’re not recommended.
Deep cycle sealed lead-acid batteries are bit more expensive than wet-cell batteries, but they’re essentially maintenance free, are resistant to vibrations, and rarely spill. The sealed lead-acid is the most popular and probably the best all around trolling motor battery. It’s what I would recommend 8 times out of 10.
Your last option is a lithium ion battery. While new to the market, lithium batteries are growing in popularity for use in trolling motors. They’re small, efficient and lightweight. The downside is they’re even more expensive than deep cycle batteries. Notwithstanding cost, their small, lightweight profile makes them a very popular option for lower capacity boats such as fishing kayaks, where weight and space are big considerations. Lithium batteries also produce a higher voltage and can sustain longer runtimes.
Several anglers report success using a 12v 39Ah AGM wheelchair battery to power their trolling motor. These batteries are a bit pricey, but not nearly as much as a lithium battery—and they tend to hold their charge a long time.
Pros and Cons of Lithium Batteries
A growing number of kayakers are using 12v lithium batteries to power their trolling motors due to their light weight, small size, and higher DOD (Depth of Discharge). As popular as they’ve become, some trolling motor manufacturers recommend against using lithium batteries with their trolling motors. Before purchasing a lithium battery, read below.
The biggest con of using a single lithium battery is that when fully charged it produces a high voltage output of 14-16v. This can wear or damage traditional DC Brushed trolling motors that are rated for 12v. There are some lithium batteries with an output of 13.8v, which may help reduce damage to brushed motors. If you can find a “12v” lithium battery with an output less than 13.8v, you should be okay to use it. 12v lithium batteries may be used with brushless trolling motors.
Larger 24v electric trolling motors typically do okay with with a “24v” lithium battery, as long as the real output is below 25.6v. Actual voltage output for lithium batteries can be difficult to determine from packaging, so make sure to check the manufacturers specifications for “output voltage.” Manufacturers will often label a battery “12v” or “24v” when actual output voltage is higher.
Voltage limiters and buck converters can be used to reduce voltage output, but these devices can also cause voltage to drop and power decrease. If you have a lithium battery, you’ll need a special LED meter to monitor power output.
Wiring Batteries in Parallel to Increase Running Time
In some instances a 12 volt trolling motor is all you’ll need to achieve the ideal thrust and speed, but may find that your battery is draining before you get done fishing. To increase your running time adding another 12 volt battery wired in parallel to your original battery can effectively double you run time (amp-hours).
Parallel: 100 amp-hours x 2 = 200 amp-hours, 12 volts
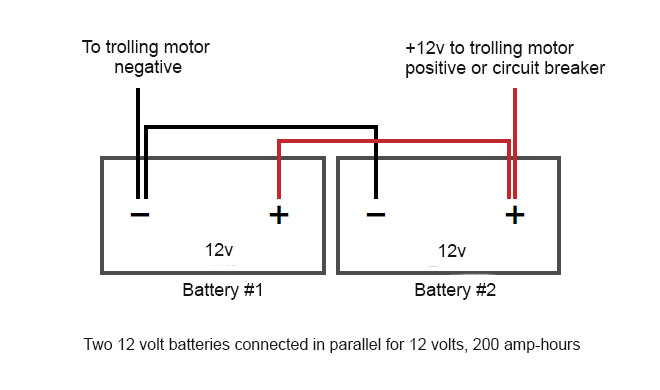
When wiring batteries in parallel, it’s important the batteries are the same type (e.g. all lead-acid, all lithium or all AGM), size (volts/amps), and age. The batteries should be essentially identical to one another.
Adding an additional battery to a fishing kayak can be challenging, but is possible if you purchase a kayak with ample storage space.
Wiring Batteries in a Series to Increase Power
Sometimes you may find that your single 12 volt trolling motor just isn’t putting out enough power to rough water conditions, current, and heavy wind. To increase power and anger can upgrade to a 24 volt trolling motor, and add an additional 12 volt battery wired to the original battery in a series—resulting in twice the power, but same run time.
Series: 12 volts x 2 = 24 volts, 100 amp-hours

Where to Store a Battery on a Kayak?
There are several spot where you can place your battery box on a kayak. Placement will be determined by your kayak type, layout, and design, so it’s a good idea to determine battery placement and storage capacity before purchasing a kayak if you intend to attach an electric trolling motor.
Most kayaks come with a front storage area that will accomodate a battery as well as the circuit breaker. Wherever you decide to store your battery you need to take into consideration your circuit breaker. Your circuit breaker needs to be easily accessible from the water so you can reset it if it gets tripped. For saltwater water kayaking, USCG regulations also require the circuit breaker to be withing 7 feet of the battery.
For sit-on-top kayaks, battery placement can be a bit more challenging. But typically batteries are attached in the front or directly behind the seat in a Pelican case, battery box, or something comparable.
Another important consideration is weight distribution. Fully loaded most weight on a kayak is typically located in the center or stearn. When you’re adding 10-40 pound batteries to your kayak you need to make sure you’ll creating an even load. Another reason putting your trolling motor battery up front is a good idea if you have the space.
Once you’ve determined the ideal location for your battery, make sure your battery cables will reach your trolling motor. Most motors will come standard with 4ft cables. If you’re battery is going to be located more than 4 feet from your motor, you’ll probably need an extension kit.
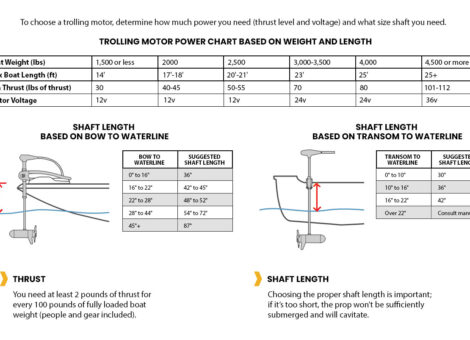
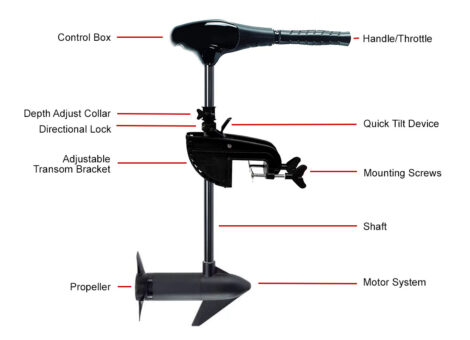
Determining Trolling Motor Shaft Length
Selecting the correct shaft length for your kayak trolling motor is essential. Too short and your propeller is going to cavitate, you’ll create excessive drag, and in a worse case scenario your prop may even hit into kayak.
Determining shaft length for a kayak is done in much the same way as you’d determine the shaft length for a larger fishing boat. First, measure the distance from the top of the motor mount to water line. Then take this measurement and use the chart below to find the recommended shaft length. For optimal performance, you want your propeller 12 inches below the water line.
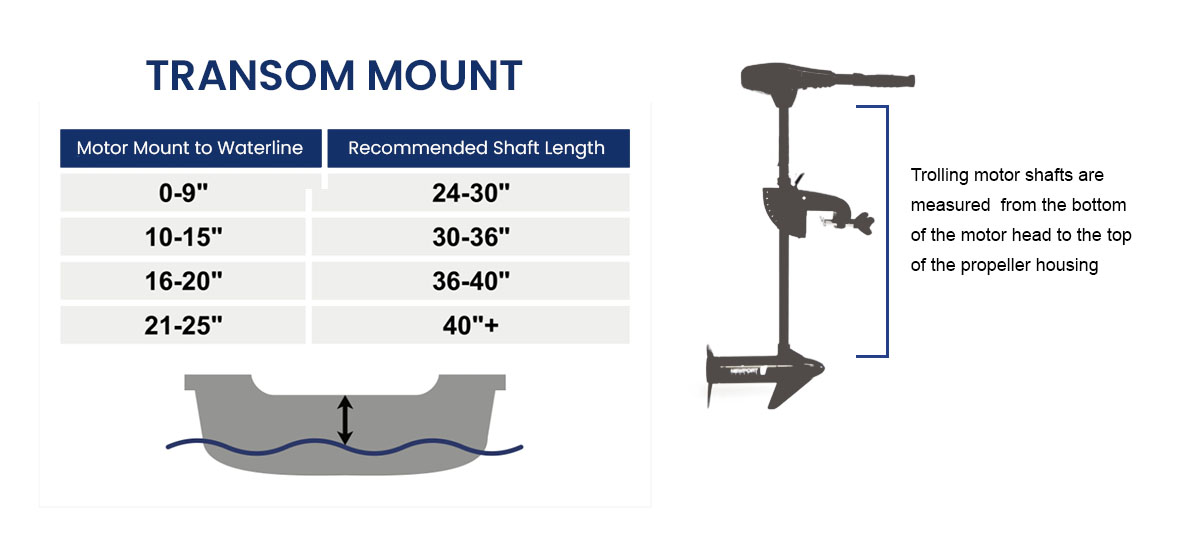
For the majority of kayak setups you’ll only need a 24 to 30-inch shaft because kayaks sit so close to the water surface. It’s still recommended that you measure and use the formula above to determine the exact shaft length recommendation before purchasing your trolling motor.
What Are My Mounting Options?
You have a few basic options for mounting a trolling motor to a kayak: side mount, transom/stern mount, bow mount, and drive pod. I’ll review the pros and cons of each mounting system below. When determining which mount is best of your kayak setup, consider a few basic questions.
- How high out of the water will your trolling motor be sitting? This will affect your shaft length requirements as well as equilibrium on the water.
- How do you plan on steering trolling motor? The mounting system you selected will determine in large part the steering systems that are available.
- Is your mounting system compatible with your kayak? Each mount type has different installation requirements. Can you access the areas on your kayak to install the mount?
Side Mount
Side mount is a common and quick setup for hooking a trolling motor to your kayak. The control arm is readily accessible and the motor is easy to control from the seat position. This tends to be one of the easier mounts to install and cost effective solutions for adding an electric trolling motor to a kayak. Good for lakes. Not great for rivers and current.
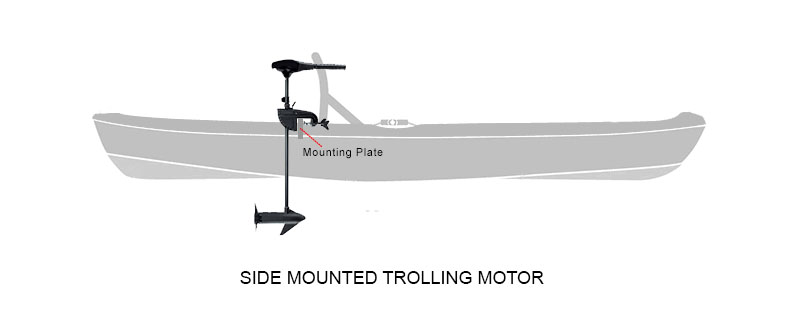
Pros:
- This is an easy mount to install.
- The control handle is very accessible.
- Motor and the mounting bar are removeable.
- Easy access to the mount.
Cons:
- Adds a lot of weight to the side of the kayak.
- Having the trolling motor on the side makes the kayak less stable.
- Tracking and steering can be challenging.
- Causes you to overcompensate for turns.
- Side mount can get in the way of paddling.
Transom/stern Mount
Attaching a trolling motor to the center back (“stern”) of the kayak as opposed to the side is a more stable setup. A transom mount occurs on a squared stern where the motor is attached directly to a vertical mounting plate. Other rear setups are simply “stern” mounted. Transom mounted trolling motors are extremely easy to take on and off.
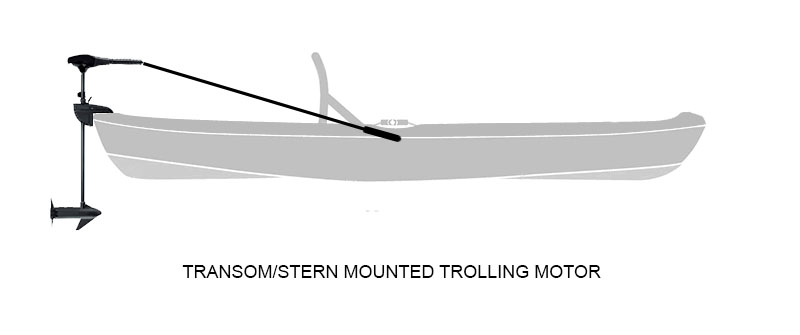
Pros:
- The center placement of a transom mount makes this setup very stable.
- A transom mounted motor is easy to remove.
Cons:
- The handle of a transom/stern mounted motor can’t be reached without an extension handle.
- The mount can be difficult to access. Cables or an actuator are required to raise or lower the motor from the water.
Bow Mount
A bow mounted trolling motor is a viable options for a kayak, but not one I personally recommend for anglers. They provide great directional control and positioning, but they’re a bit awkward on smaller vessels—such as a kayak—where turning isn’t as difficult and where the trolling motor acts as the main propulsion. For propulsion I prefer the push of a transom mount over the pull of a bow mount.
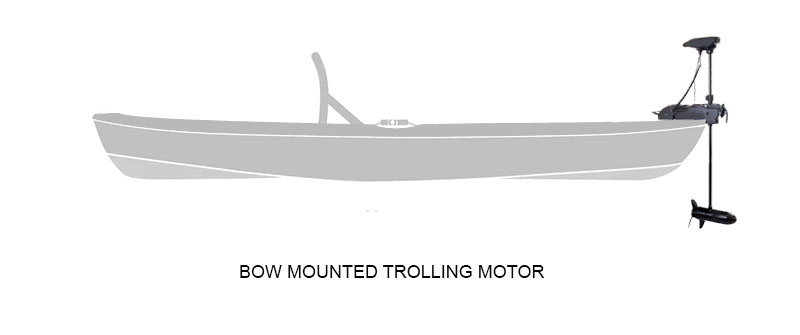
Pros:
- It is easier to pull a boat than to push a boat.
- Moving the bow of the boat side to side is easier than moving the transom from side to side.
- A bow-mounted trolling motor allows for greater control and positioning.
Cons:
- A bit harder to install.
- Take up more deck space that can be used for fishing.
- Not as ideal for smaller vessels where the trolling motor may produce the main forward propulsion.
Drive Pod Mount
Having a trolling motor installed in the main pod can be a good option depending on need and kayak design. Probably the biggest benefit of a drive pod mounted motor is its central location on the kayak. It provides easy access and maneuverability. Unfortunately, it’s easy for the motor to bottom out in the shallows so you have to be careful where you go.
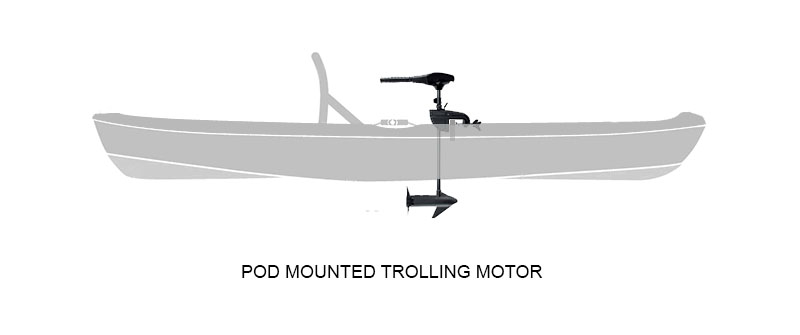
Pros:
- Central location of the motor makes a pod mount very stable.
- The handle is right in front of the seat making it easy to access and operate.
Cons:
- Drive pod mounts take time to install.
- The motor head will need to be rotated for a pod mount.
- Takes relatively longer to remove the motor.
- Motor can’t be completely removed from the water. May bottom out.
Integrated Mount
An integrated mounting system integrates the trolling motor directly into the kayak. Integrated mounted trolling motors typically connect to the stern and are controlled by cables connected to foot pedals. Integrated mounts only work on certain kayak types.
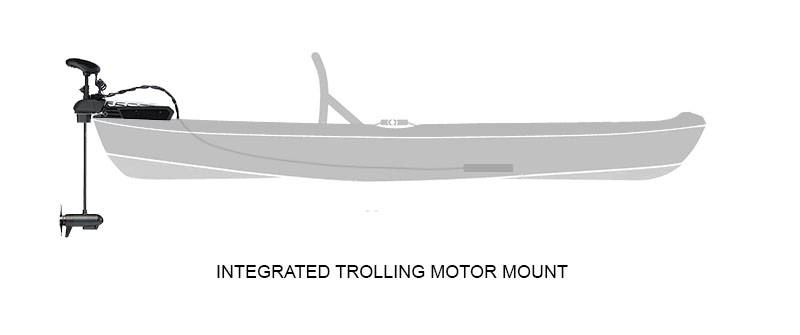
Pros:
- Integrated mounted trolling motors connect to the stern and are very stable.
- Easy to steer and control using foot pedals and variable speed control.
- Motor is easy to take on and off.
- Motor can be raised and lower from your seat.
Cons:
- Motor is a bit challenging to install.
- Integrated trolling motors are more expensive.
- As stern mount, integrated motors are hard to reach on the water.
Propeller Sizes, Compatibility, and Benefits
Each trolling motor is compatible with one propeller size. Each propeller size will come with a two or three blade option.
3-blade trolling motor propellers provide superior acceleration, top speed, and maneuverability. 2-blade props provide less drag, are more efficient, and offer a longer battery life.
You may also want to consider pitch when selecting a blade option. As rule, propeller blades with a higher pitch number will produce more top end speed. A prop with a lower pitch number will produce less speed but achieve more low-end power and performance.
Even with a prop with a high pitch, a top speed of about 5-6 miles per hour is what you can expect to achieve using a 30-55 pound thrust electric trolling motor.


