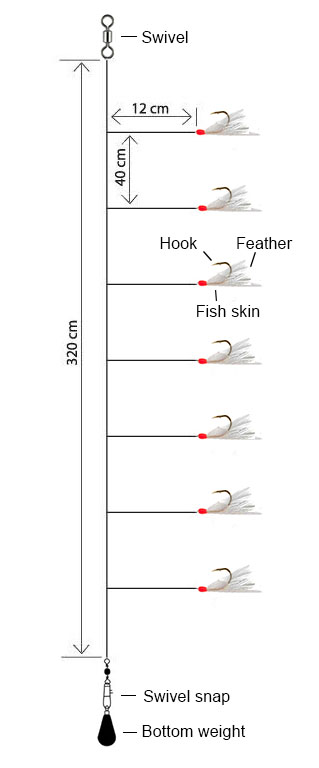
A sabiki rig is made using a leader line with a weight attached at the bottom and 6 to 10 small hooks attached to the leader above the weight. The rig is generally used for catching large numbers of small baitfish in a short time span, but it may also be used for catching larger game fish such as perch, spot, or croaker. Sabiki rigs are most often used for catching pinfish, grunts, threadfin, cigar minnows, greenbacks, squirlfish, sardines, pigfish, and the like. Sabiki rigs can be fished in fresh- or saltwater.
One of the downsides of sabiki rigs is that they don’t last long. They’re challenging to store, tangle easily, and prone to catching on clothing or skin. An active angler will typically fish a new sabiki rig on each outing. Sabiki rigs are readily available at most tackle shops, but they’re also easy to make if you’re inclined to do so.
Sabiki rigs come in number of variations which may include beads added to individual dropper lines or a piece of iridescent or luminescent material affixed to each lure or fly to spice up the presentation.
Tying a Sabiki Rig Using a Surgeons Loop Knot
A sabiki rig is one of the easier fishing rigs to tie. Below we’re going to list the steps for tying a basic 4 foot sabiki rig with seven 4″ loops using the surgeon’s (end) loop knot. This is the easiest way to create a sabiki rig. You can adapt the length of your rig and number loops to fit your needs.
The materials you’ll need to tie a sabiki rig include:
- 12′ leader line (10 lb mono)
- 7 small gold hooks (or flies/lures)
- Sinker weight (1/4 oz to 3/4 oz)
- Barrel swivel (optional)
- Snap swivel (optional)
- Beads (optional)
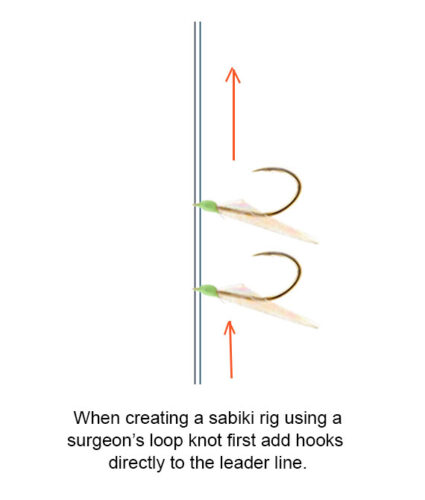
The setup for a basic sabiki rig using a surgeon’s loop knot is as follows. Each small gold hooks is tied to its own loop, which usually measures just a few inches. You can choose either identical-looking lures, or alternate the colors/patterns. Loops are tied along the leader line and the hooks are attached to the end of each loop. These loops can be placed anywhere from 2″ to 12″ apart. A weight is attached at the bottom of the leader.
Now we’ll walk through the specific steps for creating a simple 4 foot sabiki rig using the surgeon’s loop knot method.
- Cut a 12 foot length of leader line.
- Thread all 7 hooks onto the leader line.
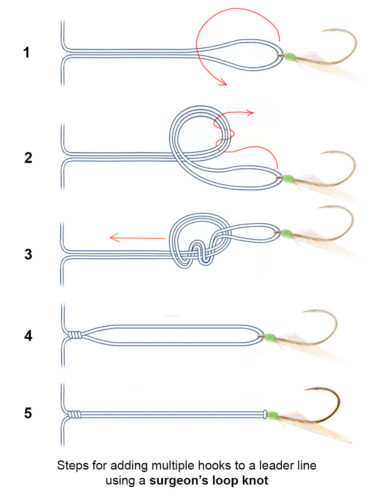
- Tie a surgeon’s loop knot in the tag end of the leader line.
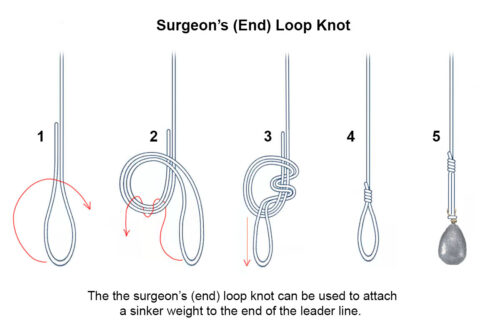
(Alternatively, you can tie the tag end of the leader line to a snap swivel using a palomar or trilene knot.)
- Thread the loop you’ve created through the eye of the weight, then loop the weight through that loop. (The weight will not come of the line now, but it is easy to loosen and remove if you want to change weights while fishing.)
- Starting from the weight, position your hooks about 6″ to 12″ apart up the leader. For a 12 foot leader you’ll want to space the hooks about 12 inches apart. If you shorten your leader to about 8 feet you can space the hooks closer to 6 inches apart.
- For each of the 7 hooks create a loop by tying a surgeon’s knot in the line. Make sure the hook is tied onto the loop of the line. Create each loop about 3 to 5 inches in length.
- Tie the free end of the leader to a barrel swivel using a palomar knot.
- Tie the barrel swivel to the main line using a palomar knot.
(Note: If you don’t want to use a barrel swivel you can attach the leader line to the main line using a simple line to line knot such as an albright or double uni knot.)
If you want a demonstration, there is a good video produced by SaltStrong that shows how to tie a sabiki rig using the surgeon’s knot method.
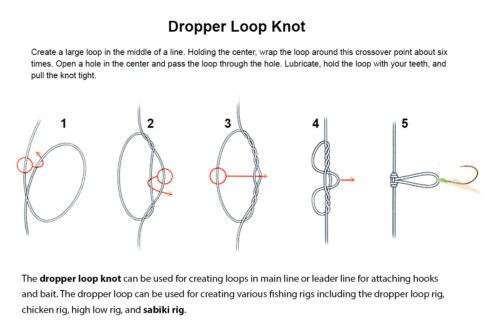
Tying Sabiki Rig Using a Dropper Loop Knot
Tying a sabiki rig using a dropper loop is not all that different than creating a sabiki rig using surgeon’s knots. You simply going to using a dropper loop knot instead of surgeon’s loop knot. We’ll walk you through the steps.
- Cut 12 foot length of leader line.
- Tie a surgeon’s loop knot in the tag end of the leader line (or attach a span swivel with a palomar knot.)
- Thread the loop through the eye of the weight, then loop the weight through the loop.
- Starting up from the weight, create a dropper loop in the leader line every 6 to 12 inches. Loops should be 3 to 5 inches.
- Add a hook to the end of each dropper loop. Pinch the top of the dropper loop to form a point and threading the point through the eye of the hook. Wrap the loop around the hook and pull tight. (Hooks can also be added to the leader line ahead of time and incorporated into the dropper loop as the knots are being tied.)
- Tie the free end of the leader to a barrel swivel using a palomar knot.
- Tie the barrel swivel to the main line using a palomar knot.
Best Sabiki Hooks, Baits and Lures
The last important step in creating and fishing a sabiki rig is knowing what hooks and lures to use. This can be a bit tricky because it really depends on your fishing method and target baitfish species.
For small baitfish species such as sardines, anchovies, pinfish, etc. a #10 hook, #12 hook or even smaller is what we recommend. If you only want to catch larger predatory species, such as mackerel, a 4/0 or even a 2/0 hook is going to be your best option. The key here is to match your hook size to your target species—considering in particular the size of their mouth.
For saltwater fishing a #10 hook tipped with small chunks of squid, shrimp or pileworm is going to be your best all around setup. When creating a sabiki rig using flies, make sure to check your local laws and regulations. Some juridictions limit rigs to just two flies.
How to Fish a Sabiki Rig
The following are few approaches to fishing a sabiki rig. Your approach can be adapted to specific water conditions and target species.
- Make sure your sinker weight is heavy enough you can easily reach and hold to the bottom.
- If fishing from a boat, position yourself over a shoal, oyster bar, or other structure where baitfish are holding.
- Drop the sabiki rig the bottom, and give short, soft 6-inch jigs with your rod tip every 3 to 4 seconds.
- If fishing from a pier, bridge or dock, cast out and allow the rig to settle on the bottom.
- Give short jerks of the rod to make the rig hop along the bottom. Continue retrieve the rig along the bottom until you feel a bite.
- If you feel even the smallest bite, give rod tip a jerk to set the hook.