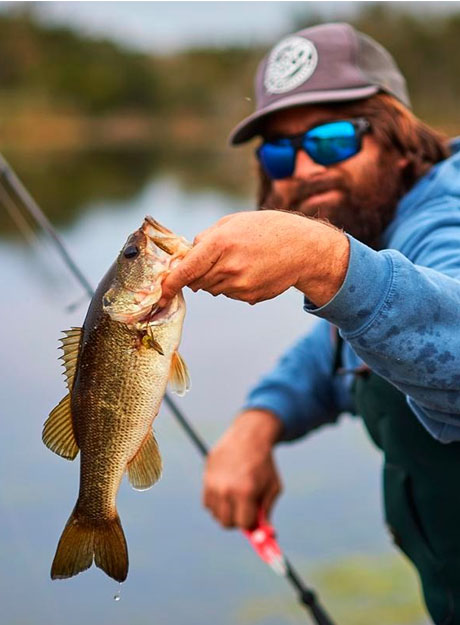
Fly fishing is a fishing method where anglers cast and retrieve artificial lures called “flies”. Flies are designed to imitate the insects and baitfish found in fishs’ natural forage. Fly fishing is used to catch fish in both fresh and saltwater. It is especially popular for fishing for trout in freshwater streams and mountain rivers.
- Essential Fly Fishing Equipment
- Setting Up Your Fly Fishing Equipment
- The Basic Overhead Fly Cast
- Fly Casting Technique
Essential Fly Fishing Equipment
Even though you don’t need to buy everything under the sky to get started, we do recommend only getting quality gear. Saving a little money upfront with cheap gear is going to cost you more in the long run. Plenty of anglers have given up on fly fishing after one too many equipment failures, so don’t let it happen to you!
Essential fly fishing gear includes a fly rod and reel; the fly backing, fly line, tippet and leader; and, of course, the flies.
Fly rod
The fly rod and reel form the core of your fly fishing setup. Fly rods are available in a range of lengths and weights. When evaluating your rod options you want to look at length, weight (size), actions, number of sections and contruction material.
LENGTH
Fly rods vary in length between 7 and 14 feet. Your average fly rod is going to be 8 to 9 feet in length. If you’re over 5′ tall, a 9’0″ rod is good starting point for the average angler. If you’re shorter, or are going to be fishing in tight quarters, you can go with a shorter fly rod around 7′. The longer the rod, the longer the casting distance.
There are also fly rods for specific applications such as the double-handed spey rod or Euro rod. Spey rods are used for spey casting—a technique that has no back-cast (the fly never moves behind the caster). Spey casting is used for fishing large salmon, steelhead, and sea trout in large rivers. Euro rods are longer 10 to 11 foot lightweight rods used for making delicated, controlled casts when employing a Euro Nymphing technique.
WEIGHT
Fly rod weight—or size—is usually denoted by “weight”, “wt”, or just “w”. A fly rod’s weight it the measure of strength. Weights range from 2—14, with 2 representing the lightest and weakest rod and 14 the heaviest and strongest rod. The most common fly rod sizes are 3 weight, 5 weight, and 8 weight. A 5 weight rod is a versatile size and good starting point for a beginner angler.
A lighter 3 weight rod is appropriate for targeting smaller bass, trout, and panfish. A heavier 8+ weight rod is going to be suited for fishing larger trout, steelhead, bass, salmon, and pike, as well as a variety of saltwater species. Heavier weight rods are also good for fishing streamers, poppers, and larger nymphing rigs.
Again, your 5 weight rod is going work well in both small and large streams and can be used for targeting fish of varying sizes.
The following chart provides recommended fly rod weights by species.
| Fish Species | Fly Rod Weight |
|---|---|
| Panfish | 0 - 4 |
| Arctic Grayling | 3 - 5 |
| Small Trout | 0 - 3 |
| Trout | 3 - 6 |
| Smallmouth Bass | 5 - 8 |
| Largemouth Bass | 5 - 9 |
| Carp | 5 - 9 |
| Steelhead | 7 - 9 |
| Salmon | 8 - 10 |
| Northern Pike & Muskies | 8 - 12 |
| Bonefish, Redfish, and Snook | 7 - 9 |
| Striped Bass | 8 - 12 |
| False Albacore | 9 - 12 |
| Golden Dorado | 8 - 12 |
| Permit | 9 - 10 |
| Tarpon and Giant Trevally | 10 - 12 |
| Mahi Mahi | 10 - 14 |
| Blue Fin Tuna | 12 - 14 |
| Sailfish and Marlin | 14 - 16 |
ACTION
Where weight refers to how easily a fly rod bends, action determines where the rod bends under a “load” or pressure.
As you cast your rod, you load it with energy that launches the fly line. Rather than casting a lure, as you do with a traditional setup, you’re casting the fly line which carries the fly to your target. There are four rod actions: fast-action, medium-fast action, medium-action, and slow-action.
Fast-action fly rods bend closer to the tip, and are best used by experienced anglers. Slow- and medium-action fly rods bend down the rod closer to the grip and are ideal for beginner anglers. Fast-action rods are less flexible and generate powerful casts and distances. Slow-action rods are more flexible and are best for shorter distance casting.
| Fast-Action | Medium-Action | Slow-Action |
|---|---|---|
| Less flexible | Flexible | Very flexible |
| Powerful casts | Multi-application | Slow line speed |
| Long distance casts | Forgiving on timing | Shore distance casts |
| Best for experienced anglers | Good for beginner to intermediate anglers | Good for beginners to intermediate anglers |
NUMBER OF SECTIONS
Fly rods range from 2 sections (“pieces”) all the way up to 5 sections. The number of sections determines how long the rod will be when broken down and can also impact overall rod flexibility. The greater the number of sections, the shorter the rod once broken down. Rods with 5 sections tend to be popular among travelers as they brake down really small and are easy to store. 2 piece rods are much longer when broken down and not terribly popular. The most common number of sections for a fly rod is 4 sections. Most 4 piece rods are manufactured with flexibility in mind.
CONSTRUCTION
The most inexpensive fly rods are made of plastic or fiberglass. More expensive rods are constructed of graphite. You’ll also find some rods made with bamboo. Plastic and fiberglass rods are more prone to breaking and short lifespans. But they’re still popular among many anglers. Graphite rods are are light, sensitive, and strong—and well suited for use in a variety of fly-fishing techniques. If you have the money, graphite is the way to go. For smaller stream or river settings, bamboo fly rods offers a unique aesthetic nostalgic experience.
Fly Reel
After selecting a fly rod, choosing a fly reel is your next step.
Rarely when fly fishing do you actually reel in a fish using the fly reel itself. Most of the time when targeting smaller fish such as freshwater trout and bass the line is retrieved by stripping—or pulling it in one length at a time. A fly reel is an essential part of your fly fishing equipment, but not quite as important as your rod.
Your fly reel should:
- Have enough capacity to hold the necessary amount of backing and fly line for the rod weight you selected. For example, if you’re using a 5 weight rod, you’ll need a fly reel that can hold 4-6 pound line.
- Have a good drag system. If you’re going to target larger fish that put up a fight you’ll want a higher quality disc drag. If you’re going to stick to small fish, a less expensive click-and-paw drag is also great.
- Be the right size so it balances correctly with your fly rod and prevents fatigue when fishing for long periods.
Try to stay away from casted fly reels. You best option is going to be a machined aluminum fly reel with either a disc or click-and-paw drag system.
One of the more affordable ways to get a quality rod and reel is to purchase them as a combination. Most manufacturers offer matched sets of rods and reels at discounted prices, and you can often get good equipment at an even better price this way.
Fly Line
With a traditional rod and reel setup there is a single line that runs from the reel to the hook. Casting is achieved by launching a weighted lure attached to the line. In fly fishing, the fly itself is very light and carries almost no weight. Instead, fly line is thicker and heavier than standard line, and provides the weight needed to make a cast.
The goal of fly fishing is to fool the fish by presenting to fly on the water as though it were not attached to anything. To do this requires a special kind of line combination, made up of four parts: fly backing, fly line, leader, and tippet.
Fly Backing is the thickest, longest part of the line and fills the reel (also known as the arbor in fly fishing). Its extra length is useful for longer fish runs, and it is usually a bright color that makes it visible against the water.
Fly Line connects the backing to the leader and tippet, and is weighted in order to make casting possible. It is also a bright, highly visible hue.
The Leader is a 9-10 foot portion of line between the weighted fly line and the super-light tippet. Where it meets the fly line it is a matching thickness, but it tapers down its length until it is very thin and almost invisible. This enables it to land lightly on the water and go unseen by the fish.
The Tippet needs to be very strong but very hard to see, since it rests on the water, connecting the fly to the leader. Remember, the fish needs to be convinced that the fly is just a fly, not bait. So your tippet must be as close to invisible as possible.
All four of these line parts come in various sizes, and choosing the correct one is based on the type of rod you have as well as what kind of fishing you’ll be using it for. Another advantage to purchasing a rod-and-reel combination is that the backing, line, leader, and tippet are all preloaded and ready to go when you are.
When using a single fly line instead of a four-part combination, you have three line choices: floating line, weight (sinking) line, or weight forward floating line.
- Floating line maintains the fly line on the surface of the water. It is the most common line for fishing trout, bass, and panfish. Floating line makes mending and detecting strikes easier and is used for “dead-drift” presentations.
- Sinking and weighted fly line positions the fly under the surface of the water at feeding level. It is designed for subsurface fishing of streamers and nymphing in ponds, lakes, and rivers.
- Weight forward floating line is tapered. Weight forward line is ideal for beginner fly anglers. It does not require experience or any special finesse presentation. It is one of the most versatile fly line options.
When selecting line size for single line setup, choose a weighted fly line that is equal to the weight of your fly rod. For example, if you’re using a 5-weight rod, you’ll want to cast with a 5-weight fly line.(If you want to cast a little farther, use a fly line that is one weight heavier than your rod size.)
Flies
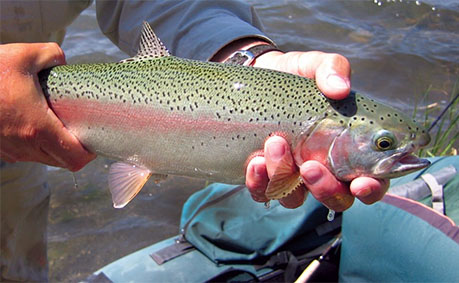
The three main types of flies for fly flishing are dry flies, nymphs, and streamers.
- Dry Flies look just like flying insects floating on the water’s surface. They are the most common, and probably what most people imagine when they think of a fly fishing bait. The most common dry fly patterns used for trout fishing in America’s cold water rivers and streams include Parachute Adams, Elk Hair Caddis, and Griffiths Gnat, Royal Wulff, Pale Morning Dun, and Chernobyl Ant.
- Nymphs are made to mimic young aquatic insects, usually the larvae stage of a fly. They are fished just below the surface. Nymph fly fishing, or “nymphing”, is the most effective method of fly fishing since nymphs are found in rivers and lakes year round and make up a majority of a trout’s diet. The most popular nymph patterns include Zebra Midge, Hare’s Ear Nymph, Pheasant Tail Nymph, and Prince Nymph.
- Streamers are bigger flies designed to imitate leeches, crayfish, baitfish, and larger aquatic insects. Streamers are fished on an active retrieve below the surface of the water. They are excellent for catch big fish and ideal for fishing low visibility conditions. The most productive streamers include Woolly Bugger, Clouser Minnow, and The Sex Dungeon.
When determining which type of fly to use, it’s best to ask a local guide or fishing shop. These experts will know which type of fly is most effective for the fish you’re targeting, and for the area you’re fishing. It’s also helpful to refer to fly hatch charts to help you “match the hatch” to ensure your fly matches the natural food source for your target fish species.
When fly fishing, your presentation is as important as your choice of flies. The are several specialized fly fishing rigs that can used in combination with fly fishing techniques to target specific fish species.
Flies can be either barbed or barbless. Barbed flies provide a solid hookset and there is less chance of loosing the fish. However, barbed flies cause a higher mortality rate than barbless flies. Barbless flies are easier to extract and safer for fish. They’re often used with catch and release fly fishing.
Additional Gear
Those are all the items of gear necessary for a basic fly fishing rig, and you can easily get started with just that. But now for some of those bells and whistles that might make your life easier:
- Fly Fishing Net – Very handy for securing the fish more easily and without damage (to you or the fish).
- Polarized sunglasses – These types of sunglasses are treated to cut glare from the sun, but they can also help you see beneath the surface of the water to the fish that might be there.
- Fly Fishing Vest – These have many useful pockets in which you can keep much of your gear close at hand.
- Waders – Without a pair of waders, you’ll have to rock hop, fish off the bank, or just get wet. But with them, you’ll be able to go wherever you want in the water without getting wet.
Setting Up Your Fly Fishing Equipment
This step isn’t difficult if you already know how to tie some basic fly fishing knots, and after a little practice it’s even easier. A rod-and-reel combination will, again, have all of this done already.
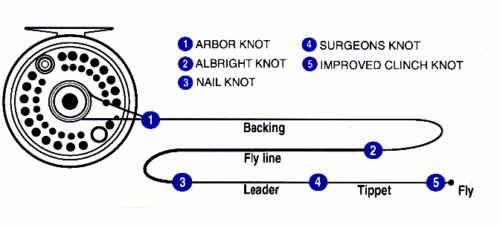
- Connect the reel to the rod. Usually the reel will slide onto the rod and lock securely into place, but make sure to follow the instructions from the manufacturer.
- Next you will pull off enough backing to spool onto your reel. This is generally about 100 feet, or 20-30 yards, but check the manufacturer’s specs on your reel as this will depend on the reel weight and spool size. The goal is to have the reel arbor filled by the backing and the line.
- Using an albright knot, tie about 2-3 feet of fly line to the backing.
- Pull off 30 more yards of fly line and cut it.
- To get the correct length of backing onto the reel, you need to start by spooling the fly line and backing in reverse. Begin with the fly line—about 30 yards of it, if you’re using our recommendation of rod and reel.
- Focus on keeping the line stretched taut, and make sure it goes evenly across the spool/arbor as you wind it on. The line should spool from the bottom of the reel.
- Continue to spool your line until it almost reaches the outside rim, but before it touches it. When it is close, trim off any extra backing, and remove the backing and the fly line.
- Use an arbor knot to anchor the backing to the arbor. Don’t forget to keep the line as taut as you can, to spool it evenly across the reel, and to make sure it spools from the bottom.
- Now, use a braid knot to create a loop at the end of the fly line. This loop makes it easy to join a leader loop to the fly line, so that you can swap leaders as swiftly as possible.
- Secure the leader to the fly line with a loop-to-loop knot.
- Connect the tippet to the leader with a double or triple surgeon’s knot.
- With an improved clinch knot, tie your fly to the tippet.
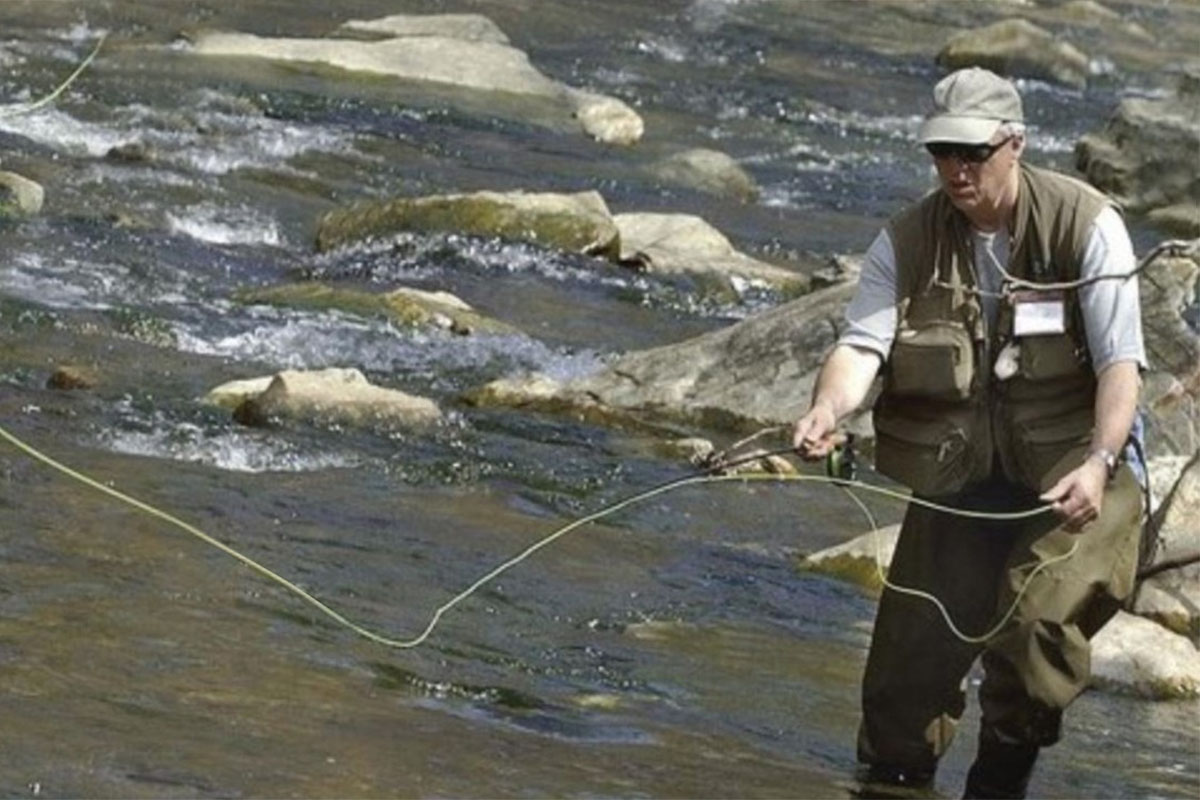
The Basic Overhead Fly Cast
Now that your fly fishing gear is prepped, you’re ready to start casting. There are a several ways to cast a fly, and each one has advantages and drawbacks. When selecting a fly casting style, consider these four things:
- Location
- Target fish species
- Target casting distance
- Your personal preference
When you’re just starting out, the best thing you can do is master the overhead cast, which is foundational to many other fly fishing casts. Getting the knack the overhead cast will make it easier for you to eventually learn other types of casts.
Fly fishing casting is as easy as 1, 2, 3, 4. Practice these 4 easy steps and you’ll be casting in no time!
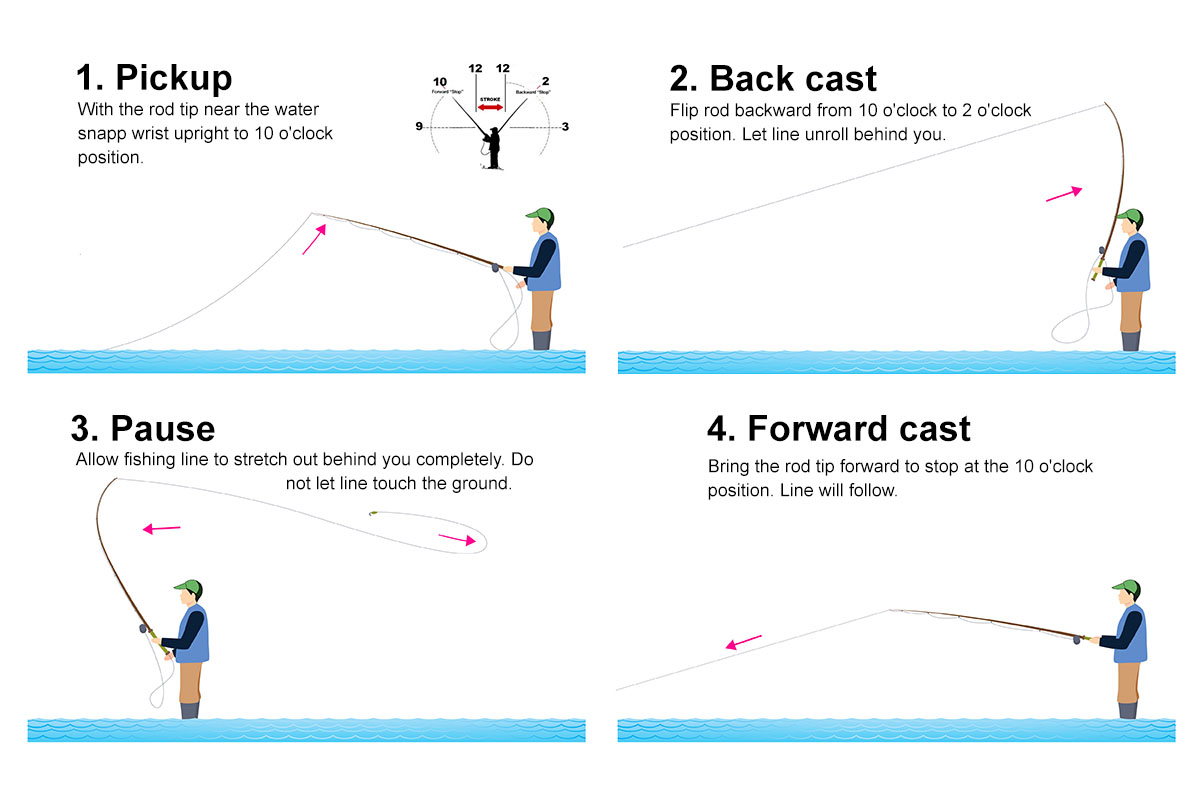
In an overhead cast, you are bringing the fly line over your head and behind your body, then cast it back out in front toward your target area. Let’s go over the basic overhead cast step by step:
- Hold the rod with a handshake position, with your hand in the middle of the grip and your thumb pointing towards the end of the rod. Trap the fly line against the rod with your pointer finger to prevent any extra line from escaping.
- Position the rod near your waist and point its end downwards. While wiggling your rod up and down to feed out the fly line, draw out about 10 yards and let it settle on the surface in front of you.
- Take a step back to put tension on the line, making it stretch out instead of drooping right to the ground or water.
- Without bending your wrist, slowly raise your arm. The line should stay tight.
- Bring your arm backwards with in a snappy, circular motion. This should make the rod bend, a.k.a “loading the rod.” Pause the rod in at 2 o’clock position, and hold there as the line forms a loop behind you. Don’t hurry! This pause is crucial to a successful cast.
- With the line now behind you, swing your arm back forward to bring the rod to the 10 o’clock position. This will cast the line forward and to your front, and a harder movement here will cast the line a greater distance. Point your rod in the direction you want the line to go.
- As the line reaches out across the water, slowly and gently bring your arm down in order to softly lay the line on the water. The line should still be tight. If you come down too hard, the line will slap onto the water and startle the fish.
Practice this movement in a large space like a grassy field or open water before you try to use it live in a fishing situation.
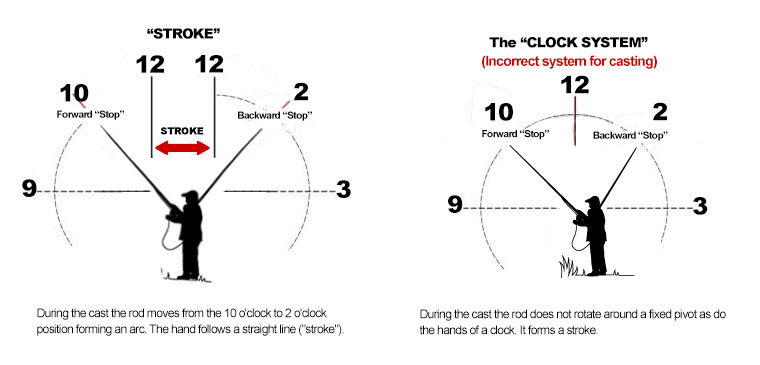
Fly Casting Technique
When casting your fly rod should follow an arc as it moves from the 10 to 2 o’clock position on an imaginary clock face. The rod will stop at 2 o’clock on the back cast and at 10 o’clock on the forward cast.
In an ideal fly cast, then angler’s hand and rod butt will move horizontally backward then forward to form a stroke as the the rod tip moves along an imaginary straight line path.
A few common problems to avoid:
- Not stopping fast enough after loading the rod
- Not starting fast enough and failing to load the rod – Snappy starts and stops are the key to properly loading the rod, getting it to bend and bear the line’s weight correctly.
- Timing issues – A lot of beginners get excited and forget to pause until the line comes behind them, but this is a very important moment in which to do nothing.
- Too much wrist action – Keeping your wrist as still as possible will keep the line horizontal and let it form the smooth arcs that create a powerful cast.