A float rig is one of the most popular types of rigs for catching freshwater or saltwater gamefish. This rig can be used to catch your target gamefish, or to gather bait fish for future fishing trips.

To create the float rig, here’s what you’ll need to get started.
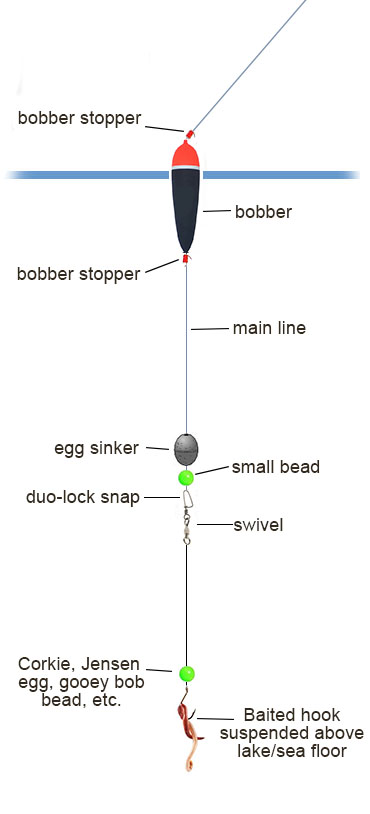
Float: You can use pretty much any material that floats, including plastic, foam, or cork. Your float will sit on the top of the water, allowing you a way to see what’s going on below the surface.
Bobber Stop: You may or may not need a bobber stop, depending on the type of float you use. Bobber stops are needed for slip floats because they allow you to set the depth while still letting the float move up and down the line.
Mainline: You’ll want to choose a main line that is stronger than your leader line.
Weight: You have a lot of different options when it comes to weights. You should choose something that helps your float sit upright in the water, while also allowing your bait or lure to get down to the appropriate depth.
Duo-Lock/Snap: Not all float rigs have a duo-lock or snap. You can add one of these if you have the need to quickly change leader lines. Otherwise, you can just attach your mainline directly to the swivel.
Swivel: This is what connects your leader to your mainline. This small, metal object also helps keep your line from getting twisted.
Leader: This is a smaller piece of line that you attach to the main line. It is usually less strong than the main line and is what you tie the hook onto. You should consider the type of fish you are targeting and the condition of the water when choosing the type of leader to use.
Corkie, Jensen egg, bead, etc.: This is another item that you don’t always need. Some anglers use a small piece of yarn which they attach to the hook using an egg loop.
Hook: You can choose any type of hook for this rig. Some options include a spoon, bait hook, spinner, jig or other type of hook.


