The chicken rig is simple-to-make bottom fishing rig that consists of a main line, 2 to 5 hooks attached to the main line on dropper loops, and a lead sinker weight on the bottom. It is a vertical presentation ideal for targeting schooling fish, including fluke, snapper, and grouper that suspend near the bottom of the water column. It is also used for fishing structure such as reefs, weeds, rocks and stumps.
A miniature version of the chicken rig, the sabiki rig, works great for catching bait too. The sabiki rig is designed to mimic schooling minnows when submerged. A traditional chicken rig for targeting larger game fish will typically have 2 to 3 larger hooks spaced about 1 to 2 feet apart on dropper loops. The sabiki version of the chicken rig will have 3 to 6 smaller hooks with 11 to 14 inches between each branch.
The chicken rig can be used for freshwater or saltwater fishing. It is often used in freshwater habitats to fish for bass.
Chicken Rig Materials and Specs
The following materials are required for tying a chicken rig. The amout of each material required will depend on the size of your chicken rig.
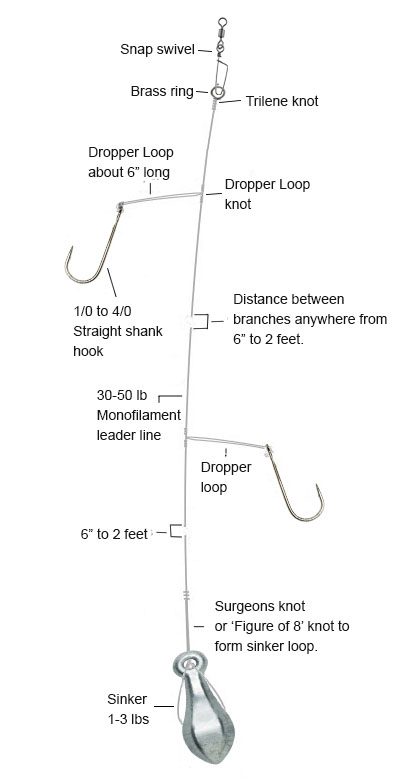
- 30-50 lb monofilament leader line (6′)
- Snap swivel (1)
- Brass ring (1)
- Straight shank hooks 1/0 to 4/0 (3)
- 1-3lb sinker (1)
How to tie the Chicken Rig
The following steps are for tying a chicken rig.
- Attach your sinker to the tag end of the leader line using a surgeons or ‘Figure of 8’ knot.
- Tie a 4-6″ dropper loop on the leader line about 6-12″ above the sinker.
- Tie a second 4-6″ dropper loop on the leader line 12″ above the first dropper loop.
- Tie a third 4-6″ dropper loop on the leader line 12″ above the second dropper loop.
- Attach a 1/0 to 4/0 straight shank hook to the end of each dropper loop.
- Attach a small brass ring to the standing end of the leader line using a trilene knot.
- Tie a snap swivel to the tag end of the main line using a trilene knot.
- Attach the brass ring on the leader line to the main line using the snap swivel.
3 knots for tying the Chicken Rig
The following three knots can be used for tying any chicken rig. They’re relatively easy to tie and provide good strength.
- Connection of rig leader to main line. The rig leader can be connected to the main line using a swivel snap which clips from the main line onto a brass ring attached to the chicken rig leader. A strong knot for making these two connections is the trilene knot. The trilene knot can be used with monofilament or braid line types.
- Dropper Loops. The loops that attach the hooks to the leader line to create the branches are tied using a traditional dropper loop knot. To create a dropper loop 6 inches long, you’ll need about 13-14″ of line. For a 3 hook chicken rig that is 3 feet in length you’ll need just over 6′ of leader line to work with.
- Sinker Loop. The sinker loop is attached at the bottom of the leader line using a surgeons knot or ‘Figure of 8’ knot. One of the benefits of using the Figure of 8 knot is that if the sinker gets caught, and the rig snags, the line will most likely break at the sinker.
To attach a hook to each of the dropper loops, pinch the top of the loop to form a point. Thread the point through the eye of the hook. Then take the loop and run it up and over the hook and pull it tight. It’s that easy.